my crabitat build photo journal!!
-
Guest
love it! love it! love it! I wish I had the budget to do such a huge project. I love making terrariums and vivariums. It is so much fun and the fun continues even after it's done! Your terrarium is awe-inspiring! What I love about Terrariums are, it's not that high maintenance as people think if it's made right the first time. I think you did a wonderful job!
-
 joshjahnke
- Posts: 6
- Joined: Fri Apr 08, 2011 5:55 pm
- Location: Alberta, Canada
First of all, I'd just like to say kudos! What an incredible set up! I have one question (I haven't read all the posts, mainly just looked at pictures so far) - do you have an approx. dollar amount that a project like this would cost someone? If you don't want to share, that's fine. I was just wondering what kind of funds I should look at spending if I want to come out with something like this. Thanks!
-
 curious_kitty
Topic author - Posts: 148
- Joined: Sat Jan 23, 2010 11:25 pm
- Location: Boston, MA
lol thank you everyone! The tank has been running really really well for... I forget how long it's been(I suppose since the last photo update?) Everything except for the 'live plants'. My humidity has been up between 75-90%(lower end at the end of the day, and it mists for 10-20 sec for 5 times throughout , so it goes up to 90%+ after that, and tapers off).
This enclosure did not cost that must at all, let see,
- the heat cable=$20
- two 55W light with reflector kit from AH store, for $70 each.
- misting kit $99
- coco peat giant brick(two) $14 each=$28
- Titebond glue $12/gallon, used 2
- sand $3/50lb bag, total of 6.5 bags $18
- leftover cocopeat from previous tank(to be mixed with sand)= free
- styrofoam blocks= free, from packing material
- foam sprays= used about 6 cans to fill the gaps only between styrofoam pieces= $3 each, total $18
- display glasses cut= all three pieces, around $180
- branches, $8
- Live plants= a lot of $$, i wouldnt do it if I were you- therefore free for you
dont forget that this was done over the course of several month, so quite little $ but nice results.. lol everyone loves the tank when friends come visit!
I hope this helped..! Go back to my first few pages on this thread, and should explain how I did this in detail. happy Crabbing!
This enclosure did not cost that must at all, let see,
- the heat cable=$20
- two 55W light with reflector kit from AH store, for $70 each.
- misting kit $99
- coco peat giant brick(two) $14 each=$28
- Titebond glue $12/gallon, used 2
- sand $3/50lb bag, total of 6.5 bags $18
- leftover cocopeat from previous tank(to be mixed with sand)= free
- styrofoam blocks= free, from packing material
- foam sprays= used about 6 cans to fill the gaps only between styrofoam pieces= $3 each, total $18
- display glasses cut= all three pieces, around $180
- branches, $8
- Live plants= a lot of $$, i wouldnt do it if I were you- therefore free for you
dont forget that this was done over the course of several month, so quite little $ but nice results.. lol everyone loves the tank when friends come visit!
I hope this helped..! Go back to my first few pages on this thread, and should explain how I did this in detail.
Godmother to two tuxedo cats, PPs and Es, violas, indos, strawberries and ruggies, Wifey to one VERY patient hubby
200g crabitank under construction started on 4/10/2010
200g crabitank under construction started on 4/10/2010
-
Guest
-
curious_kitty
Topic author - Posts: 148
- Joined: Sat Jan 23, 2010 11:25 pm
- Location: Boston, MA
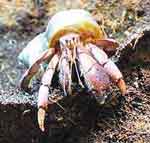
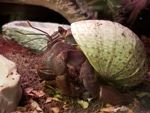
Plastic plants galore......
After they've done their deed on my last fresh live plant sets in the tat, I gathered few ideas and headed off to local craft store and picked-up few realistic looking plastic plants. I thought I'd never see the day that I was going to have plastic plants in my home......but hermit crabs made me kneel on my knee with both my hands and legs up. I gave in.
soo here it is, my plastic plant galore.... in my crabitat. My misting system still turns on as it did before, and it helps to drench the plastic plants to make them dewy, and more realistic. sigh..
please... don't ask how much I spent on my live plants... its..... tooo painful.....
I dare my violas and strawberries to try and destroy my plastic plants. I can always go get more,, for much less $$$!!! eh HAHAHAHAHA


Godmother to two tuxedo cats, PPs and Es, violas, indos, strawberries and ruggies, Wifey to one VERY patient hubby
200g crabitank under construction started on 4/10/2010
200g crabitank under construction started on 4/10/2010
-
 CrabbyMom33
- Posts: 1223
- Joined: Sat Jun 26, 2010 10:03 pm
- Location: Gahanna, OH
-
Actionizer
-
wendyj
-
Hermitcrablover12
- Posts: 33
- Joined: Fri Dec 03, 2010 4:16 pm
- Location: Massachusetts
I am going to re-do my tat and I want to use that foam and coco paste you used to create the background. Also, the heating cable would be good for my 55. It is a must here in MA. ;D What foam did you use for the stuff I mentioned and what heat cable? Where did the cable go? Underneath the egg crates? Thank you! ^^
-
curious_kitty
Topic author - Posts: 148
- Joined: Sat Jan 23, 2010 11:25 pm
- Location: Boston, MA
hi there! I used the box styrofoams(like the ones that comes when you buy a computer) and I carved it using a exacto knife. To put small pieces together, I used long bamboo skewers and styrofoam glue to hold them toghether..Hermitcrablover12 wrote:I am going to re-do my tat and I want to use that foam and coco paste you used to create the background. Also, the heating cable would be good for my 55. It is a must here in MA. ;D What foam did you use for the stuff I mentioned and what heat cable? Where did the cable go? Underneath the egg crates? Thank you! ^^
The heat cables is the one that looks like a cord. Its made for reptiles, and the color is like brown(if you look through my previous postings, i do have pictures of things I bought, and have used, and where I bought them from.)
good luck, and do post the pictures of your awesome tat when you are done!!!
Godmother to two tuxedo cats, PPs and Es, violas, indos, strawberries and ruggies, Wifey to one VERY patient hubby
200g crabitank under construction started on 4/10/2010
200g crabitank under construction started on 4/10/2010
-
Hermitcrablover12
- Posts: 33
- Joined: Fri Dec 03, 2010 4:16 pm
- Location: Massachusetts
-
 DustAndEchoes
- Posts: 139
- Joined: Fri Apr 22, 2005 8:06 pm
- Location: NW USA
- Contact: