Let the 55g build begin!

For presenting do-it-yourself projects for your crabitat and for discussing and displaying custom built crabitats. Also for questions and reviews on equipment and products. *Stores and their reviews now have their own section in Classifieds*
Locked
User avatar

Topic author
Sassypants
Posts: 30
Joined: Mon Dec 29, 2014 11:39 am
Location: Chicago suburbs

Let the 55g build begin!

Post by Sassypants » Thu Jul 23, 2015 8:31 pm

After quickly going from a 10g to a 29g, The Addiction had me perusing CL for a 55. I found one for a good price, but needed a stand. We wanted something that would match our living room furniture, but anything of even decent quality would have cost several pints of blood and my everlasting soul. So I decided to build one instead. A little lumber, a healthy dose of insanity, and a lot of planning later, a stand began to emerge. ImageImageImageImage
When completed, there will be doors on either side and a shelf in the middle. And more importantly, it will support a 55 and not look like a particle board nightmare in the living room.

On to the tank! Today the corner guards were cut and installed. And yes, because I'm obsessive, I created a jig so the holes in the corner guard were evenly spaced. Image
Image
Image

Then onto the pools. They're OXO containers, nice and clear so we will be able to see if any of our crabbie tribe decide to take a swim. I went with the 'container within a container' idea so I can take the inner one out to clean it and not drag sand across the house. There's a few holes drilled into the outer container so that annoying 'container suction' thing doesn't happen. The blue pebbles are just for a wonderful splash of color.

Then I took a couple of bird ladders, cut them to length and attached needlepoint mesh. On the bottom of the pools for crabbie traction are a couple of suction cup bathtub appliques, cut to fit. Everything is designed so I can easily and quickly take everything apart to clean it.
Image
Image

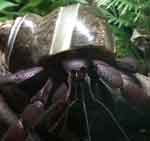
The last two of my tribe that were down molting are back up and look fabulous! Image Now that all ten are up, time is of the essence to get this project finished and get all ten of the tribe moved into Crabtopia. Stay tuned for more progress!
Last edited by Sassypants on Fri Jul 24, 2015 9:07 pm, edited 1 time in total.
Crabby since 11/14
Kids with shells: Crabcakes, Fritter, Rangoon, Gumbo, Chowder, Noodle, Chip, Eggs, Peach and Bagel
Kids with fur: Cheyenne, Rumer, Skyler
RIP: PP Jambalaya

What if the Hokey Pokey really IS what it's all about?


lemonlimebitters
Posts: 8
Joined: Thu Jul 16, 2015 8:33 pm

Re: Let the 55g build begin!

Post by lemonlimebitters » Thu Jul 23, 2015 9:14 pm

wow that stand looks amazing!!!!!

User avatar

Asheka
Posts: 742
Joined: Tue Mar 10, 2015 9:42 pm
Location: Kingston Ontario
Contact:

Re: Let the 55g build begin!

Post by Asheka » Fri Jul 24, 2015 1:43 am

Amazing job on the stand, and cool idea with the pools! Can't wait to see more pictures!
4 cats. 1 Dwarf African Frog. 1 amazing fiance. Four PPs; Peeta, Finnick, Katniss, and Rue.
Don't Hate What You Don't Understand PRIDE!
http://crabtaztic.blogspot.ca
Turning the gross and scary cute and merry at PlayfulDead Creationz

User avatar

Crabinski
Posts: 1977
Joined: Fri Oct 10, 2014 4:56 pm
Location: Arizona

Re: Let the 55g build begin!

Post by Crabinski » Fri Jul 24, 2015 4:17 pm

Sassypants, I love that you said "On to the tank! Today the corner guards were cut and installed. And yes, because I'm obsessive, I created a jig so the holes in the corner guard were evenly spaced. " Yes! Someone more obsessive than me! All I did was use a ruler and a Sharpie to mark the exactly-evenly-spaced holes on the corner guard strips before drilling :lol: .

BTW, that stand is gorgeous: much more attractive than any you'd find in a store and much sturdier, too, I'm sure.
PPs are Big Enzo, Charles Paris and Mr Pinch
On the Big Beach in the Sky: Murray, Gino, Oscar, Gordon, Ignatz, Harry and King Felix the Pale
Also Mom to Imogene the Syrian Hamster

User avatar

Topic author
Sassypants
Posts: 30
Joined: Mon Dec 29, 2014 11:39 am
Location: Chicago suburbs

Re: Let the 55g build begin!

Post by Sassypants » Fri Jul 24, 2015 9:10 pm

Thanks lemonlime, Asheka and Crabinski! I've done woodwork projects before, but nothing to this scale. I designed it on SketchUp and went from there. I'm happy about how it turned out, and it didn't cost me anywhere near $600+ to get a nice oak stand.
And Crabinski, I think we're compulsive kindred spirits. :D
Last edited by Sassypants on Fri Jul 24, 2015 9:31 pm, edited 1 time in total.
Crabby since 11/14
Kids with shells: Crabcakes, Fritter, Rangoon, Gumbo, Chowder, Noodle, Chip, Eggs, Peach and Bagel
Kids with fur: Cheyenne, Rumer, Skyler
RIP: PP Jambalaya

What if the Hokey Pokey really IS what it's all about?

User avatar

Topic author
Sassypants
Posts: 30
Joined: Mon Dec 29, 2014 11:39 am
Location: Chicago suburbs

Re: Let the 55g build begin!

Post by Sassypants » Fri Jul 24, 2015 9:30 pm

Today, the climbing wall went in. It's plastic hardware mesh secured on all sides to the corner guards so crabbies can't get behind it. There's about an inch of space between the mesh and the back wall, so the tribe can climb to their heart's content. I can also hang plants or attach bark without blocking the airflow around the UTH. Image

Then I built a stand for the pools out of PVC and egg crate. It supports the pools so they don't potentially crush a crab that is digging below them. There's also holes in the bottom of the PVC posts (that will get covered with landscape fabric) that will allow me to siphon out any excess water should a flooding incident occur. Or, I'll just give the crabbies little pails so they can help bail out the tank. Image
Image
Image
Image
Now impatient me gets to drum my fingers for a week while I wait for the varnish on the stand to fully cure. Then I can set everything up and start adding substrate and oodles of fun crab stuff. That's the fun part. Can't wait! Image I'm going to be so tickled to watch the tribe explore their new digs.
Crabby since 11/14
Kids with shells: Crabcakes, Fritter, Rangoon, Gumbo, Chowder, Noodle, Chip, Eggs, Peach and Bagel
Kids with fur: Cheyenne, Rumer, Skyler
RIP: PP Jambalaya

What if the Hokey Pokey really IS what it's all about?

User avatar

Form
Posts: 15
Joined: Sun Feb 23, 2014 12:20 pm
Location: Indiana

Re: Let the 55g build begin!

Post by Form » Sat Jul 25, 2015 2:53 pm

Everything looks great! That stand is beautiful and I really like your climbing wall. I tried to do something similar in my tank with a fish net, but my implementation wasn't as professional as yours. Net ended up being a bad choice and I didn't have it taunt enough for proper climbing, but I think yours will work quite well.
2 PPs: Turbo (F), Mike (?)
55g tank
Crabber since ~ Oct 2013

User avatar

aussieJJDude
Administrator
Administrator
Posts: 4999
Joined: Fri Feb 24, 2012 8:12 pm
Location: Melbourne, Australia
Contact:

Re: Let the 55g build begin!

Post by aussieJJDude » Wed Jul 29, 2015 7:57 am

Wow; this is turning out to be quite interesting... I would love to see how it goes! :)
|| Avid Aquarist Addict (2007) || Crazy Crabbing Connoisseur (2012) || Amateur Aroid Admirer (2014) ||

"She’s there, she’s upright, and she’s wigged" ~ Trixie
Infrequently on due to studies


Sweet Pea
Posts: 113
Joined: Sat Jun 29, 2013 5:20 am

Re: Let the 55g build begin!

Post by Sweet Pea » Fri Jul 31, 2015 2:14 pm

Clever idea for the pool support! I'm looking forward to the rest.

User avatar

Topic author
Sassypants
Posts: 30
Joined: Mon Dec 29, 2014 11:39 am
Location: Chicago suburbs

Re: Let the 55g build begin!

Post by Sassypants » Fri Jul 31, 2015 9:16 pm

Thanks Form, aussie and Sweet Pea. I'm curious to see how this turns out too. [GRINNING FACE WITH SMILING EYES]


Finally a little more time to work on the tat!

Got the UTHs on the back and one side. Insulated the back with 2" of foam insulation covered with two layers of heavy duty aluminum foil on the front and duct tape all around. Overkill? Yeah, probably. But we had it left over from a construction project. Plus the only place for the tank is the northwest corner of the living room, which will be the coldest corner during our Chicago winter. I'm hoping to keep the heat in and the cold out. Once the side was also insulated, it was time to finally move the tank into the house. Yay! Progress!

Tomorrow I start loading the sand/EE mix. I plan on having beer and Aleve ready when I'm done.

ImageImage
Crabby since 11/14
Kids with shells: Crabcakes, Fritter, Rangoon, Gumbo, Chowder, Noodle, Chip, Eggs, Peach and Bagel
Kids with fur: Cheyenne, Rumer, Skyler
RIP: PP Jambalaya

What if the Hokey Pokey really IS what it's all about?

User avatar

Lelu
Posts: 10
Joined: Sat Oct 17, 2015 12:12 pm
Location: Atlanta

Re: Let the 55g build begin!

Post by Lelu » Fri Nov 06, 2015 6:00 pm

Anymore updates? :D Looks great!

User avatar

mlakers
Posts: 496
Joined: Fri Oct 02, 2015 11:12 am
Location: Blacksburg, VA
Contact:

Re: Let the 55g build begin!

Post by mlakers » Tue Nov 10, 2015 9:52 pm

More please!! This is such an amazing project! I'm drooling over all the important small details. So great to get it right from the start. It's like a planned community....whereas my 55 gallon developed more like urban sprawl. :)


jasonmom
Posts: 142
Joined: Sun Jul 14, 2013 5:55 pm

Re: Let the 55g build begin!

Post by jasonmom » Sun Nov 15, 2015 9:19 am

I'm really enjoying your progress. Hope you continue to post.

Locked