Constructing the Display Case Crabitat!

For presenting do-it-yourself projects for your crabitat and for discussing and displaying custom built crabitats. Also for questions and reviews on equipment and products. *Stores and their reviews now have their own section in Classifieds*
User avatar

Topic author
wodesorel
Tech Support
Tech Support
Posts: 10573
Joined: Thu Oct 01, 2009 8:49 am
Location: Leetonia, Ohio
Contact:

Constructing the Display Case Crabitat!

Post by wodesorel » Wed Mar 24, 2010 1:40 pm

UPDATE: THE Display Case Crabitat was completed on December 7, 2010! For photographs and more details on the finishing of the case please view the thread in the Pictures section.

viewtopic.php?t=78205


We're finally getting started on this thing!

The display case is probably from the 1950's. My hubby bought it at a local pharmacy when they closed and were having an auction for everything in the store. He bought it about 15 years ago for around $20. He was using it for his Matchbox Car collection before we moved in together.

It's glass, with plastic supports between the panels. The wood is veneered. It has four sliding glass doors in the back for access, and has pre-drilled holes for metal shelving supports. We have one glass shelf for it, the other broke some time ago. There may be a key somewhere to lock the doors as well, but we haven't found it yet.

The dimensions are smaller than what I was hoping. The interior dimensions are 20" deep, 48" long, and 40" high. That makes it about 166 gallons (629 liters, for the rest of the world. :) ).

I forgot to take a specific picture of it before we started, but it's in this picture that I took of the cats on the first day we had the windows open. (My mother loves when I send her kitty pictures at work. :) )

Image
(Windows left to right - Mohawk, L.S. Skitter. Floor clockwise from Top - Charlie, Izzy, Franny, Tink)

The idea, after a lot of research into custom built vivariums, amphibian enclosures, and reptile tanks is this:

1. Knock out base of case.

Image
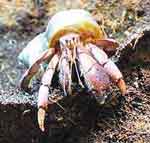
(Lola - the crab obsessed cat)

Image
(Even though it's closed up, the smallest cats can still get inside from the opening in the bottom. That's Tink.)

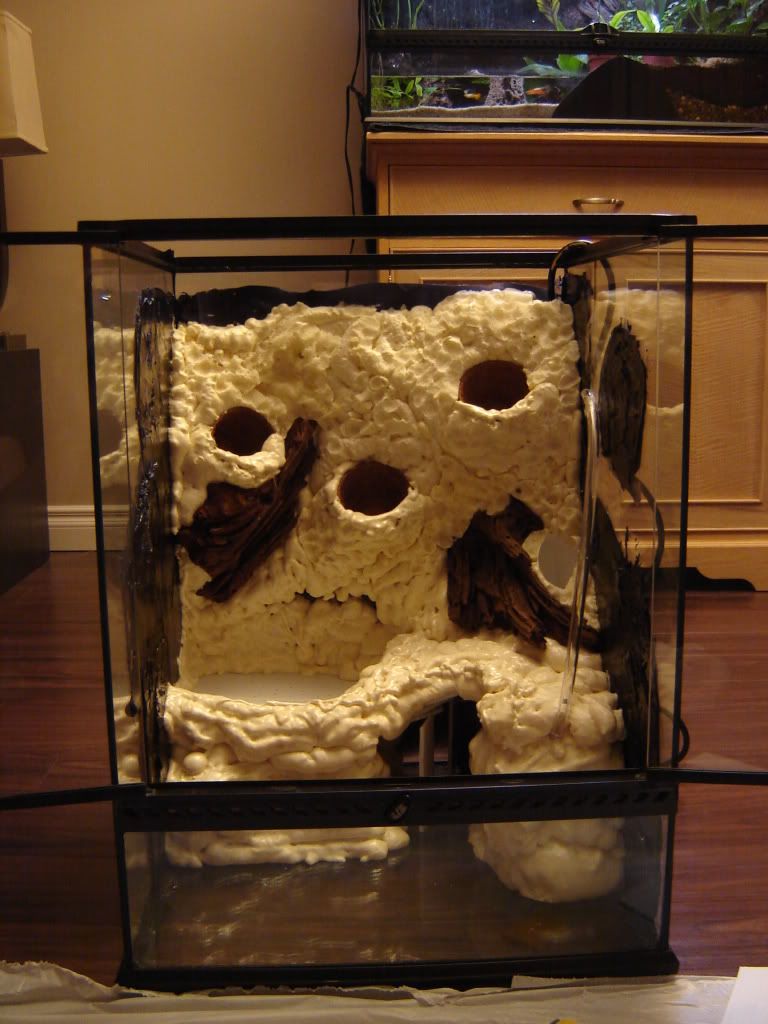
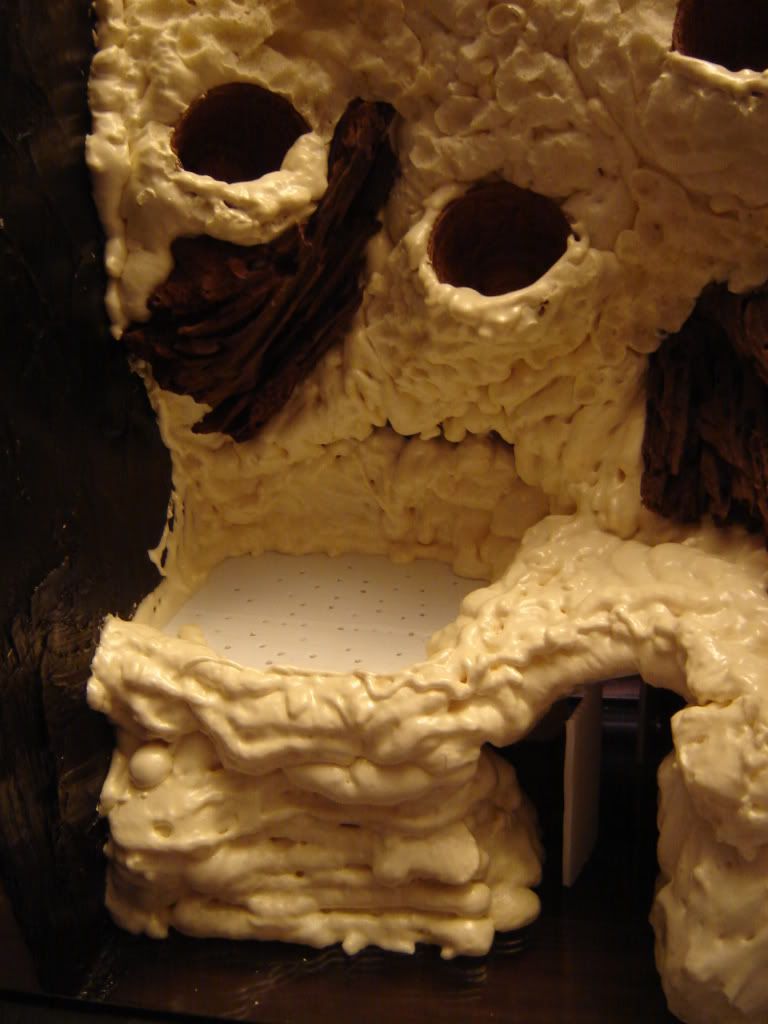
2. Screw in supporting boards in bottom of case creating a solid pit that can hold the weight of wet sand.

3. Seal all wood surfaces inside and out with three or four coats of water-based Spar Urethane. (Have to wait for 70 degree days.)

4. Glue heavy-duty 100% PEVA shower liner to bottom of case. Seal edge of plastic against glass with silicone.

5. Seal over all plastic supports inside case with silicone. Seal outside glass to wood with silicone.

6. Place in three inch high plexiglass strip at back of case to keep sand out of door tracks.

7. Coat metal shelf hangers in plasti-dip. When dry, silicone into place in tank.

8. Create custom screens for two of the door openings from black abs pipe and fiberglass screening.

9. Figure out a way to mount heat lamp from the inside front of tank. (I don't have a clue on this one! I just know I want it to shine toward the back of the tank, rather than out the front.)

10. Come up with ideas for a hanging moss pit and a solid floor shell shop (probably storage containers).

11. Make hammocks and other hanging places made from fishnet and using the shelf supports.

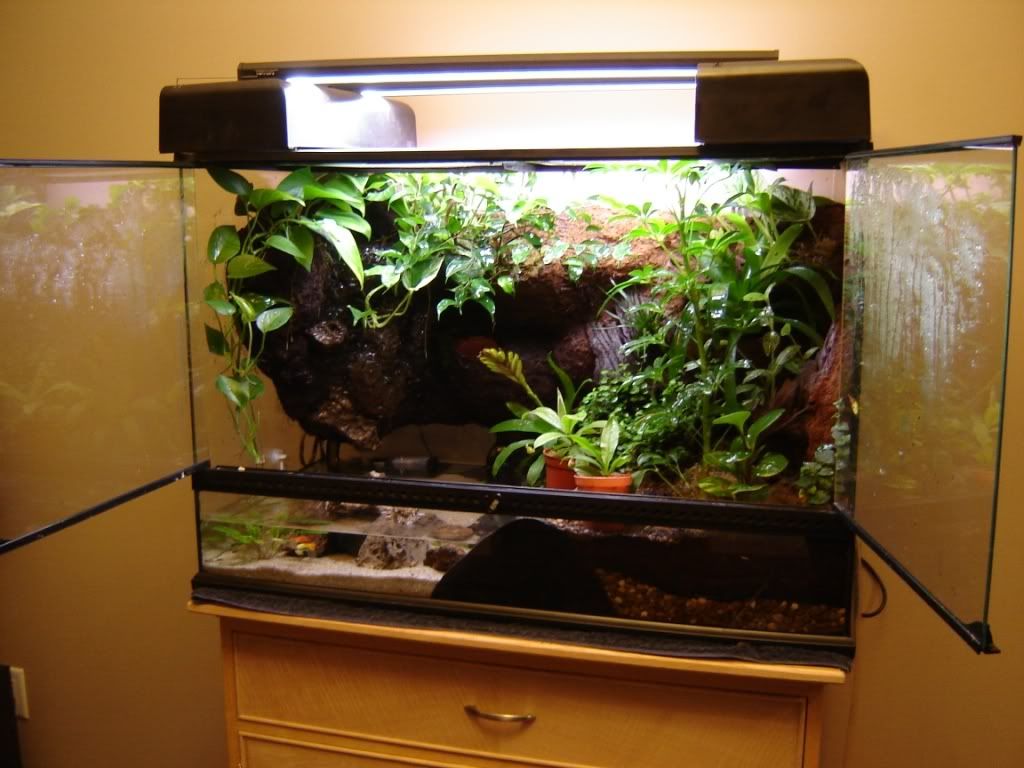
12. Use lots of wood from the lilac in the backyard. It's ancient and desperately needs the dead-wood cut out. I can flake the bark off, sterilize it, and it'll be nice and dry and have really intriguing shapes to it.

13. Add sand, fake plants, and cocohuts

14. Add the whole PP clan (there's 15 of them now!)

15. Disassemble the 15 gallon for parts and move all the teeny Es into the 29 gallon.

I'm hoping to spend about $50 for the structural aspects of the tank. The decoration will come later and in smaller stages. (A plastic plant this pay, a neat hidey-hole next pay.)

I'm getting so antsy about getting this done! Almost everything is weather dependent. Hurry up and get here warm weather!!!!!
Last edited by wodesorel on Sun Dec 12, 2010 4:11 am, edited 1 time in total.
Want to see all my crazy pets? @waywardwaifs on Instagram


jereka

Post by jereka » Wed Mar 24, 2010 1:45 pm

Wow, that is quite the project, but I see a beautiful finish product. I can't wait to see pictures of the finished product. Sending warm weather vibes your way! (Its snowing where I live, so I'm sending vibes, not my weather lol)

Good luck
C

User avatar

sugarselections
Posts: 360
Joined: Sat Mar 08, 2008 12:59 pm
Location: SW Ohio

Post by sugarselections » Wed Mar 24, 2010 2:59 pm

Sounds amazing. Too bad you don't live closer since I have some extra crabitat decor that I need to get rid of.

User avatar

curious_kitty
Posts: 148
Joined: Sat Jan 23, 2010 11:25 pm
Location: Boston, MA

Post by curious_kitty » Tue Mar 30, 2010 10:05 pm

wow!! That is soo awesome! especially since I was looking into building one similar to your size- mine is the space, around 49"x25" deepx 45" high! I ordered pond liner to line inside the space, and also will be heading out to homedepot to get some Styrofoam for insulating the side of the walls. I also ordered misting system, which will help me mist the tank every few days or so...... I can't wait to see how your project will turn out!!!! I havent really started out mine yet as my 40g tank currently sits on that spot, and am waiting for few molters to some up lol
Godmother to two tuxedo cats, PPs and Es, violas, indos, strawberries and ruggies, Wifey to one VERY patient hubby
200g crabitank under construction started on 4/10/2010

User avatar

suebee
Posts: 451
Joined: Wed Aug 26, 2009 11:14 am
Location: Lumberton NJ
Contact:

Post by suebee » Tue Mar 30, 2010 10:41 pm

Love it! and did i count 8 cats? love them too. I am redoing my tank yet again this weekend. I will have the sand castle hut saturday and I want to use a few of those plant leaf mats i got a great deal on! I love to re do. I might cut some of those mats and make some kind of leaf cave? still working in that. I also was thinking of using them to make a second level of some kind, they are dense enough and very light. I cant wait to have more Green in the tank, then i can weave some of the dollar store flowers into it. Im pretty sure all my molters are up, ill have to do a count. I know I have extra tank stuff too. I could fill up a box for ya.
I buy from ELHC or HCP, I CANNOT RECEIVE PM MESSAGES SO EMAIL ME,anytime! suebeebuzz@me.com visit my Hermit Crab Dollar Store. Crabbing from aprox 1974- I own 12 Species,On Face Book-Susan Staff's Coenobita Research of New Jersey

User avatar

Topic author
wodesorel
Tech Support
Tech Support
Posts: 10573
Joined: Thu Oct 01, 2009 8:49 am
Location: Leetonia, Ohio
Contact:

Post by wodesorel » Wed Apr 14, 2010 9:09 am

Well, after searching everywhere for water-based spar urethane I still can't find it. I can't even find it online unless I want to buy a whole case of the stuff! So there goes that idea.

After doing a bit more research I've decided to use Envirotex Lite epoxy instead. It seems that many marine fish keepers have been using this product safely in their tanks for years without any toxicity problems. It's 100% solids, and has no VOCs, so once it's dry it should become nothing more than inert plastic. There are craft people who have said that even though it's a pour-on product used for finishing table tops it can still be brushed on. A few thin layers should work to create a completely waterproof coating! (Crossing fingers, anyway!)

Still waiting for the weather to stabilize since it needs to be warm to stain the wood. (Also, waiting for my hubby's shoulder to stop hurting since he's the only one who can lift the darn thing. :) ) We've decided on a black wood-stain to hopefully make the case look more dramatic.

Stupid Ohio weather.......
Want to see all my crazy pets? @waywardwaifs on Instagram

User avatar

curious_kitty
Posts: 148
Joined: Sat Jan 23, 2010 11:25 pm
Location: Boston, MA

Post by curious_kitty » Wed Apr 14, 2010 10:03 am

wodesorel wrote:Well, after searching everywhere for water-based spar urethane I still can't find it. I can't even find it online unless I want to buy a whole case of the stuff! So there goes that idea.

After doing a bit more research I've decided to use Envirotex Lite epoxy instead. It seems that many marine fish keepers have been using this product safely in their tanks for years without any toxicity problems. It's 100% solids, and has no VOCs, so once it's dry it should become nothing more than inert plastic. There are craft people who have said that even though it's a pour-on product used for finishing table tops it can still be brushed on. A few thin layers should work to create a completely waterproof coating! (Crossing fingers, anyway!)

Still waiting for the weather to stabilize since it needs to be warm to stain the wood. (Also, waiting for my hubby's shoulder to stop hurting since he's the only one who can lift the darn thing. :) ) We've decided on a black wood-stain to hopefully make the case look more dramatic.

Stupid Ohio weather.......
Oooo, I hope you start your project soon~!(come on weather, help us out!) I, too, have to wait for my DH to help me go hunting for branches(at floral supply store, but they open till 3pm, so itd have to be over the weekend :( ). Have you thought about using those foam sprays(made for sculpting rocks around the waterfall, and pond, also fish safe)??
:cheer:
Image
people from reefs/vivarium say that you use it to make backgrounds(it acts as an insulating layer too), and usually cover it with aquarium silicone and put cocofiber to hide it.. or use grout mix to make it look like a realistic stone/rocks. I got four cans of these, and i hope it works out the way it should. As for covering over the foam(since hermies might nibble at it), I might consider using a grout mix ,etc. We will see...
your display case looks really awesome, and i can't wait for you to start making it!!! :bounce: :bounce: :bounce:


ooo, I've used that resin to seal small table top, and they work really well(hard and waterproof).
i also heard something about marine epoxy, (western brand??) that reef people use to make tank out of plywood.here is a link if you want to check it out!

http://www.discountmarinesupplies.com/c ... 2godY0FHFQ
http://www.jamestowndistributors.com/us ... &page=GRID
Godmother to two tuxedo cats, PPs and Es, violas, indos, strawberries and ruggies, Wifey to one VERY patient hubby
200g crabitank under construction started on 4/10/2010

User avatar

Topic author
wodesorel
Tech Support
Tech Support
Posts: 10573
Joined: Thu Oct 01, 2009 8:49 am
Location: Leetonia, Ohio
Contact:

Post by wodesorel » Wed Apr 14, 2010 11:39 am

The major constraining factors on the conversion is the cost. :) West System epoxy would have been my first choice, but it's not available in my area and costs about a hundred dollars to order online. Waaay outta my price range! I think I can cover the whole case with the Envirotex for about $30 including supplies. It's been used to create false bottoms (mixed with sand) in marine tanks with no effects on fish or corals.

I've heard wonderful things about Great Foam from viv forums! I've always been a leary of using it since it dries so softly. That's fine when you have a frog with no claws, but I do worry about my idiots tearing it pieces. :lol: Can you let me know how it goes? I was wondering what would be a good coating that they would have problems getting through. Grout is an interesting idea!
Want to see all my crazy pets? @waywardwaifs on Instagram


wendyj

Post by wendyj » Wed Apr 14, 2010 11:51 am

Loving your idea and can't wait for the warm weather to get here so we can get updates and see pics!

User avatar

curious_kitty
Posts: 148
Joined: Sat Jan 23, 2010 11:25 pm
Location: Boston, MA

Post by curious_kitty » Wed Apr 14, 2010 11:56 am

The major constraining factors on the conversion is the cost. :) West System epoxy would have been my first choice, but it's not available in my area and costs about a hundred dollars to order online. Waaay outta my price range! I think I can cover the whole case with the Envirotex for about $30 including supplies. It's been used to create false bottoms (mixed with sand) in marine tanks with no effects on fish or corals.

I've heard wonderful things about Great Foam from viv forums! I've always been a leary of using it since it dries so softly. That's fine when you have a frog with no claws, but I do worry about my idiots tearing it pieces. :lol: Can you let me know how it goes? I was wondering what would be a good coating that they would have problems getting through. Grout is an interesting idea!
man.. I totally agree with you on the cost factor. I've already spent way too much, and I am sitting here, scratching my head- but then I look at those little antennae with cute little eyes, and it makes me feel little better(but still,, pretty expensive)
I read soo much about the use of foams, and since we are dealing with pinchy friends, I totally agree on the issue. since I did decide that my new tank will be sort of focal point in dining room area, I am going to use the waterfall foam to do little bit of landscaping. I am going to test out two different approaches on covering up the foams as they cannot be left as is with our pinchy friends
1) cement/grout
2)Titebond wood glue III(rated safe for human) + cocofibre paste, that will dry hard over the foams. even if pinchy friends nibble at it, it would be strands of cocofibre pieces sticking out on the surface as this Titebond stuff dries hard
Since cement/grout approach requires painting, this makes it more complicated. Me+paint= mess
I am going to go with Titebond wood glue(i bought a gallon jug for $25), mixed with cocofibre to create a paste for covering over foams. This method has been used extensively by vivarium users and they said with constant water flowing through(not in my case), it stands up to wear- and tear well.
here is one of the users in vivarium forum who used titebond III glue with cocofiber to paste over the foam.
http://www.edmontonreptiles.com/forum/s ... hp?t=15314

Image
Image
Image
Image

Image
What does "Ultimate" Really Mean?
Titebond® III is the most advanced wood glue available today. It combines the strength, sandability, ease of use and water cleanup of PVAs (aliphatic resins) with the durability, open time and water-resistance of polyurethanes.

* Waterproof - Passes ANSI/HPVA Type I Specification
* Superior strength
* Longer open time
* Lower application temperature
* Resists solvents, heat and mildew
* Unaffected by finishes
* Water cleanup & Non-toxic
* FDA approved for indirect food contact
* Sands easily without softening
* Safer than traditional waterproof glues


Ultimate in Waterproof
Passes Type I water resistance
Ultimate in Strength
4,000 psi
Ultimate in Time
10-minute open time
Ultimate in Temperature
Down to 47°F
Godmother to two tuxedo cats, PPs and Es, violas, indos, strawberries and ruggies, Wifey to one VERY patient hubby
200g crabitank under construction started on 4/10/2010

User avatar

Dog Lips
Posts: 111
Joined: Thu Jul 10, 2008 9:10 pm
Location: Eating Your Food

Post by Dog Lips » Fri Apr 16, 2010 9:33 pm

So, gonna use that "Great Stuff Expanding Foam"?


They use it in Marine tanks.....I think and fish/crabs etc. munch on 'em with no bad effects. So they're good

And of course, get some black silicone, put it on the side of the tank FIRST (don't want that ugly white/yellow mess. Then put Eco-Earth on the silicone you put on the foam, boom. jungle wall.
^^^^^^^^^^^^|II ___
| ______________ l '|""";..,l ____
|_…_…______===|= _|__|…, ] |=
"(@ )'(@ )""""*|(@ )(@ )*****(@)

User avatar

curious_kitty
Posts: 148
Joined: Sat Jan 23, 2010 11:25 pm
Location: Boston, MA

Post by curious_kitty » Fri Apr 16, 2010 10:41 pm

Dog Lips wrote:So, gonna use that "Great Stuff Expanding Foam"?

They use it in Marine tanks.....I think and fish/crabs etc. munch on 'em with no bad effects. So they're good
And of course, get some black silicone, put it on the side of the tank FIRST (don't want that ugly white/yellow mess. Then put Eco-Earth on the silicone you put on the foam, boom. jungle wall.
uh huh. I got the Great Stuff for Pond and waterfallsImage, and also some black aquarium silicones. I am sure Wodesorel can definitely use black aquarium sealant on hers too!
Godmother to two tuxedo cats, PPs and Es, violas, indos, strawberries and ruggies, Wifey to one VERY patient hubby
200g crabitank under construction started on 4/10/2010

User avatar

Topic author
wodesorel
Tech Support
Tech Support
Posts: 10573
Joined: Thu Oct 01, 2009 8:49 am
Location: Leetonia, Ohio
Contact:

Post by wodesorel » Fri Apr 16, 2010 11:31 pm

Maybe on the next build, but I don't think it would work for this one. :( I love the idea! For a tank with a solid back it would be gorgeous. The way this case is designed is that the sliding access doors are the entire back of the case. I wouldn't be able to cover them up as they are the only way in.

I might use the idea for some home-made decorations though! I think it would make for some interesting free-standing caves. :)

And I'm already playing with ideas for a completely home-made case that could fit behind the couch. (If I wanted to ever have a third species it would take some doing to find room for another enclosure.) Not that it'll probably ever happen, but a wall of the foam/EE would be awesome looking in it. :D
Want to see all my crazy pets? @waywardwaifs on Instagram

User avatar

Topic author
wodesorel
Tech Support
Tech Support
Posts: 10573
Joined: Thu Oct 01, 2009 8:49 am
Location: Leetonia, Ohio
Contact:

Post by wodesorel » Sun Apr 18, 2010 4:47 pm

Okay, so I thought about it for two days and I'm going with the foam after all. Curious_kitty - you've convinced me! I'm following your build and I just love what you've done!

If I make a wood skeleton support first, and then cover that with foam, I'll be able to solve a bunch of problems at once. There'll be a second level with removable shell shop and moss pot. It'll waterproof the vertical surfaces without having to try and use the pour-epoxy. And I can build up a lip on the back so the sand won't pour out. It's perfect!

But I think instead of using cocofiber I'm going to use sand to cover the foam instead.
Want to see all my crazy pets? @waywardwaifs on Instagram

User avatar

curious_kitty
Posts: 148
Joined: Sat Jan 23, 2010 11:25 pm
Location: Boston, MA

Post by curious_kitty » Sun Apr 18, 2010 6:15 pm

wodesorel wrote:Okay, so I thought about it for two days and I'm going with the foam after all. Curious_kitty - you've convinced me! I'm following your build and I just love what you've done!

If I make a wood skeleton support first, and then cover that with foam, I'll be able to solve a bunch of problems at once. There'll be a second level with removable shell shop and moss pot. It'll waterproof the vertical surfaces without having to try and use the pour-epoxy. And I can build up a lip on the back so the sand won't pour out. It's perfect!

But I think instead of using cocofiber I'm going to use sand to cover the foam instead.
Thats sooo awesome! ok, here is a quick tip that i learned from this- I wished I had lots of those Styrofoam blocks( i threw a bunch about couple weeks ago,, darn!)- I only had 3 large pieces, and after using it for three levels I wish I had more to fill large gaps- this would've saved me lots of $$$$ for spray foams. You can also use small carving knife to shape the styrofoams/foams the way you want! If you have those styrofoam blocks laying around, use them to build your levels, caves, and etc etc- and use those bamboo skewers/or toothpicks to connect/build pieces of styrofoams to make shapes, or adding on more body to the styrofoam. Then I would use spray foams over those pieces to make it a whole. Then you can cover the structures with sand(thats a great idea, btw!) over the foam. This will be sooo exciting!!
Godmother to two tuxedo cats, PPs and Es, violas, indos, strawberries and ruggies, Wifey to one VERY patient hubby
200g crabitank under construction started on 4/10/2010

Locked