my crabitat build photo journal!!

For presenting do-it-yourself projects for your crabitat and for discussing and displaying custom built crabitats. Also for questions and reviews on equipment and products. *Stores and their reviews now have their own section in Classifieds*
User avatar

Topic author
curious_kitty
Posts: 148
Joined: Sat Jan 23, 2010 11:25 pm
Location: Boston, MA

Post by curious_kitty » Sun Apr 11, 2010 3:27 pm

lol funny you mention about the space! my DH is going nuts over my tanks(now 5 of them), and finally gave in about this idea. next week, I do have to get few glass pieces cut(one in front to act as a substrate stop), and two pieces that will be used as a sliding door. Its taking abit longer as I am trying to 'clean up' my mess as I go... itd be better if I didn't have to do that!
I've been definitely browsing different reptile forums, and they all really have awesome DIY ideas on how to make an awesome display tank under budget.
http://www.lizard-landscapes.com/Fake-r ... inner.html
<-- this one is a good start


I am using egg crate on the side of the walls, and my heat cables will be wrapped around it to supply heat for my hermies.
Image
this egg crate will also serve as a bone in which my pond waterfall foam(for sculpting rocks, etc) to stick to, since it wont stick well to pond liner

Also, if you are using glass tanks to house hermies.. i found really cheap(but cool looking) shelves that looks really natural. I got 5 boxes of this, at $10 each online.
Image
Image
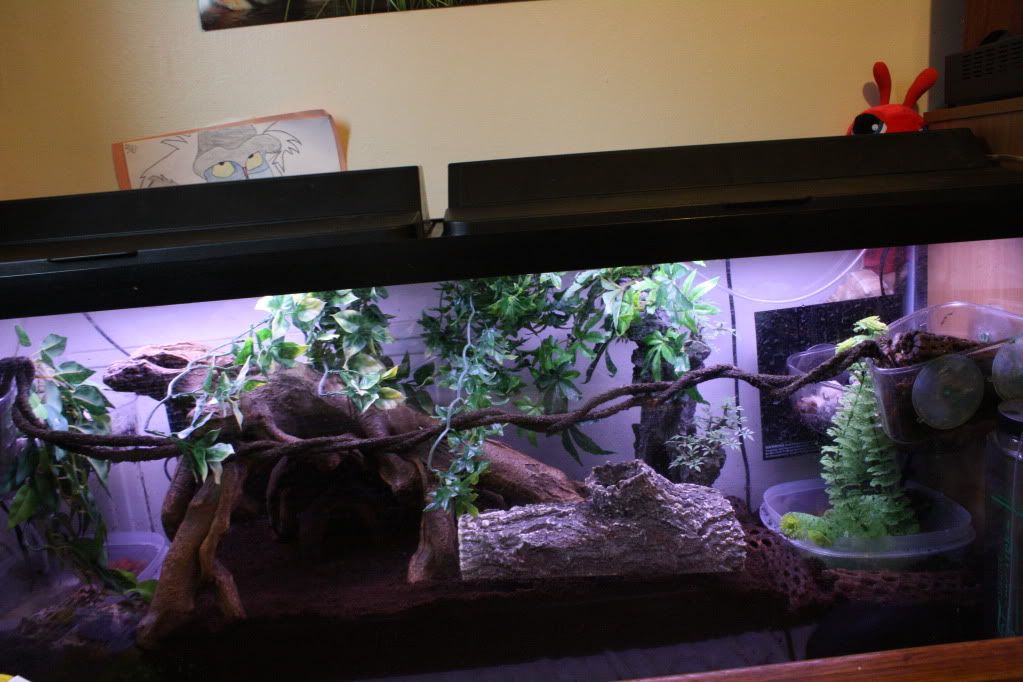
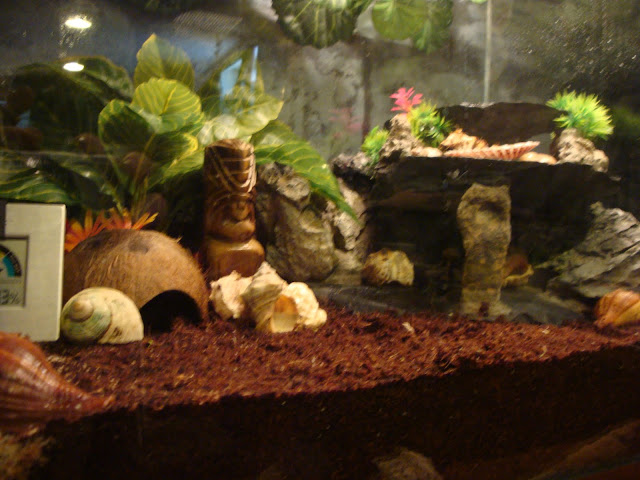
another really cool landscape design i found online.. hope its not copyrighted!!lol
Image

I also realized that the ventilation fan might be slightly visible.. so I might have to go to PetCo to see if there are any realistic looking plastic plants to cover up the vent.
im still lining the walls right now... then I have to use pond liner glue to cover up any staples to prevent rust. then over the lining, I will be attaching egg crate pieces(with heat cable) over it, secured by some roofing screws(do not rust), and use foam spray over it to sculpt shapes!
Last edited by curious_kitty on Mon Apr 12, 2010 10:15 am, edited 1 time in total.
Godmother to two tuxedo cats, PPs and Es, violas, indos, strawberries and ruggies, Wifey to one VERY patient hubby
200g crabitank under construction started on 4/10/2010

User avatar

Ellinj0206
Posts: 71
Joined: Tue Aug 22, 2006 8:27 pm
Location: The Garden State
Contact:

Post by Ellinj0206 » Sun Apr 11, 2010 6:24 pm

I cannot wait to see how this is going to look!!!! This is a pretty awesome project!
Check out El's Shells: http://www.elsshells.com for all of your hermit crab food and shell needs!All-natural, certified organic food and an outstanding selection of shells and crabitat necessities---all at great prices!!

User avatar

CallaLily
Posts: 3831
Joined: Sun Aug 03, 2008 9:05 pm

Post by CallaLily » Sun Apr 11, 2010 8:31 pm

Sounds amazing! I can't wait to see! :D

User avatar

tlivs
Posts: 93
Joined: Sat Sep 26, 2009 12:50 am
Location: Alberta, Canada

Post by tlivs » Sun Apr 11, 2010 8:34 pm

those crabs are going to think they have been let back into the wild
arthur, charlie, ralph, hunter and oliver
rip. benjamin

User avatar

Rosepetalbed
Posts: 62
Joined: Mon Jul 24, 2006 2:54 pm
Location: Worcester, Massachusetts
Contact:

Post by Rosepetalbed » Mon Apr 12, 2010 6:49 am

WOW :shock: That is going to be one amazing crab set up.....waiting patiently for the picture updates!!! :D
125 Gallon tank with 54 crabs ...E's PP'S,Violas,Rugs, And Indo's

User avatar

Topic author
curious_kitty
Posts: 148
Joined: Sat Jan 23, 2010 11:25 pm
Location: Boston, MA

Post by curious_kitty » Mon Apr 12, 2010 9:54 am

thank you so much guys~! I'd grown so fond of my hermit crabs that I blew alot of $$ collecting supplies for them .... thankfully my DH makes enough so he isn't complaining too much on my spending habits. lol
i've been collecting ALOT of random pictures about different landscape(including here on HCA), and I want to compile them here(can never have too many pictures!). If you have any cool ideas, please feel free to make any suggestions!! I am open to all ideas!!
sooo here are mine:

Image
here is one from members of this forum(I have pic saved, but don't know the User name.. anyone know??)
Image
Image
Image
one from a member from dart frog forum
Image
Sugar's tat
Image
Image
Image
JeriC's
Image
Aquav's
Image
Killi's
Image
Karbon's awesome rock art piece and his tat
Image
Last edited by curious_kitty on Mon Apr 12, 2010 10:20 am, edited 1 time in total.
Godmother to two tuxedo cats, PPs and Es, violas, indos, strawberries and ruggies, Wifey to one VERY patient hubby
200g crabitank under construction started on 4/10/2010


Guest

Post by Guest » Mon Apr 12, 2010 10:03 am

this is going to be amazing, i be when its done everyone will be thrilled to get a new home XD

User avatar

Topic author
curious_kitty
Posts: 148
Joined: Sat Jan 23, 2010 11:25 pm
Location: Boston, MA

Post by curious_kitty » Mon Apr 12, 2010 10:11 am

lol I hope so! but then,,, I bet they won't know the difference lol
more pictures for inspiration!
Image
Image
Image
Image
Image
Image
BenM135's
Image
Image
Image
Godmother to two tuxedo cats, PPs and Es, violas, indos, strawberries and ruggies, Wifey to one VERY patient hubby
200g crabitank under construction started on 4/10/2010


Guest

Post by Guest » Mon Apr 12, 2010 1:57 pm

HOLY WOW!
I CANNOT wait to see how this looks once its done!

I have the shelves that you posted. I love them for the ability to make my tank multi-leveled, but they are a pain! They do not stick very well and I find myself having to constantly reset them up. I also have a lot of the earth substrate slipping through the cracks of them so I use more moss than anything on them to keep the humidity up. Let me know if you find a solution to keep them stuck on the thank!! I am still working on one for mine!

Good luck and cant wait to see it finished!


Guest

Post by Guest » Mon Apr 12, 2010 2:07 pm

:shock: I envy you. and I bet my crabs will when you're done. :D Your ideas remind me of the idea I had for the one place we were going to move to at one point. It had a similar little alcove. Can't wait to see picture.

User avatar

Topic author
curious_kitty
Posts: 148
Joined: Sat Jan 23, 2010 11:25 pm
Location: Boston, MA

Post by curious_kitty » Mon Apr 12, 2010 8:42 pm

valissa wrote:HOLY WOW!
I CANNOT wait to see how this looks once its done!

I have the shelves that you posted. I love them for the ability to make my tank multi-leveled, but they are a pain! They do not stick very well and I find myself having to constantly reset them up. I also have a lot of the earth substrate slipping through the cracks of them so I use more moss than anything on them to keep the humidity up. Let me know if you find a solution to keep them stuck on the thank!! I am still working on one for mine!
yeah.. I noticed that their suction cup that holds the piece wasn't too impressive... its not a rubber. more like a hard plastic.. lol I was thinking I can drill a hole on the shelf, and tie a string through a hole on the background(like cork bark or acrylic sheet of some kind). Then I can set the cork bark(silicone as a glue?) or acrylic sheet(you can use double sticky tape to put it against the glass)against the wall and shelf should stay put on the substrate.. what do you think??
Image
Last edited by curious_kitty on Mon Apr 12, 2010 8:48 pm, edited 1 time in total.
Godmother to two tuxedo cats, PPs and Es, violas, indos, strawberries and ruggies, Wifey to one VERY patient hubby
200g crabitank under construction started on 4/10/2010

User avatar

Topic author
curious_kitty
Posts: 148
Joined: Sat Jan 23, 2010 11:25 pm
Location: Boston, MA

Post by curious_kitty » Mon Apr 12, 2010 8:46 pm

ookami_meggle wrote: Your ideas remind me of the idea I had for the one place we were going to move to at one point. It had a similar little alcove.
keke I am actually glad that this alcove is turning into a crabitat. its such an ackward space since there is little window next to it.. so i couldn't put in any cabinets, or other useful shelves. But if the tank works out it would be much better use of the area!
there is another smaller alcove in the livingroom.. I am going to look for an opportunity to turn that one into some sort of terrarium after I practice with this one lol

theoretically, one can easily turn any space/even a cabinet into a crabitat using a pond liner. and sliding glass door can be easily added
Godmother to two tuxedo cats, PPs and Es, violas, indos, strawberries and ruggies, Wifey to one VERY patient hubby
200g crabitank under construction started on 4/10/2010


Guest

Post by Guest » Mon Apr 12, 2010 9:43 pm

The one we saw had a teeny little cupboard up above. I would love to visit your house when you fill the walls with tanks. :D Next you will be working on a whole room for them.... then a house. XD
I didn't think about the fan idea though. That's a good idea. :3 Cant wait cant wait to see the finished projects. :)

User avatar

kgbenson
Posts: 228
Joined: Sun May 31, 2009 3:23 pm
Location: USA

Post by kgbenson » Tue Apr 13, 2010 9:02 am

sugarselections wrote:Generally I soak all wood for a bit in salt water before baking.

Not a bad idea - provided you add time for the water to evaporate before you start timing the "sterilization" part of the baking. The evaporation of the water will keep the wood at lower temps that if it is dry.
I wouldn't bother with the 10 minutes thing if you are truly trying to sterilize. The following guidelines would be OK, but 10 minutes is not long enough for a number of pathogens.

170 degrees C (340 degrees F) - 1 hour
160 degrees C (320 degrees F) - 2 hours
150 degrees C (300 degrees F) - 2.5 hours
140 degrees C (285 degrees F) - 3 hours

Another option is to dig out that old pressure cooker (which is nothing but a stove top autoclav) and steam sterilize the wood. They have some huge ones out there and they can be had at garage sales fairly frequently as people lose interest in canning and such.

Or, sit the stuff in the sun on a hot day for several hours. Sunlight works wonders, and it is free!

Or, use a 10-20% bleach solution, then rinse really well and let air dry.

That should kill the stuff that is on it from the pet store/importer etc, an so what if you contaminate it with bugs from your house - they are in the tank already.

Keith

User avatar

kgbenson
Posts: 228
Joined: Sun May 31, 2009 3:23 pm
Location: USA

Post by kgbenson » Tue Apr 13, 2010 9:20 am

For lighting consider either high output T5 flourescents or a metal halide. These will do two things, one, contrubute to the heating, and potentially provide any live plants with much needed photons.

Also - rather than misting with timers, get a humidity controller instead and mist when needed, and not when it is not needed.

I agree on the fans - the crabs like them and it cuts down on stale air spots. I use a silent -X computer fan - dead quiet, it is also 12 volts so no real electrical hazard there.

Check out the guys over at nanotuners.com or nanocustoms.com (same company) they have all sorts of light kits and fans - and they are real smarties when it comes to solving some tricky environments problems. They are really reef tank guys - but they can be convinced to help with other things.

Keith

Keith

Locked